Longarm University
Your source for machine quilting education, tools and supplies
Circle Template Tutorial
Below are the basic instructions for stitching a circle with my Circle Templates
Included with each set of Circles Templates is a 28 page, step-by-step, photo illustrated, spiral bound instruction manual.
The following instructions are excerpts from the Instruction Manual that comes with each set of the Circle Templates.
The Basic or Individual Circle
Stitching circles with a longarm machine is not hard. The easiest way I have found to stitch circles is with translucent circle templates. Stitching around the templates is not hard, but it does take a little bit of practice and patience.
Begin by drawing a horizontal line with whatever marking tool you prefer. This will be used as your registration line. I think that, next to the circle template itself, the most important part of successful template work is the registration lines. If desired, draw a vertical registration line.
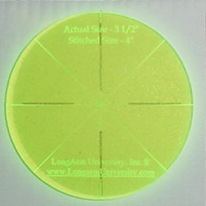 Place
one of the etched lines of the circle template on top of the drawn
registration line. If you are using a vertical registration line, place
the center of the circle template on the intersection of the horizontal
and vertical registration lines. If the template seems like it is slipping
on the fabric, spray a small amount of quilt basting spray on one side of
the template. Keep the sticky side of the template next to the fabric.
See photo at the left.
Place
one of the etched lines of the circle template on top of the drawn
registration line. If you are using a vertical registration line, place
the center of the circle template on the intersection of the horizontal
and vertical registration lines. If the template seems like it is slipping
on the fabric, spray a small amount of quilt basting spray on one side of
the template. Keep the sticky side of the template next to the fabric.
See photo at the left.
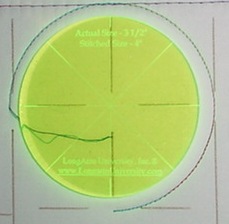 Bring
your machine to the 9 o’clock position on the template. Bring up your
bobbin thread and place the thread “tails” under the template. This will
hold your threads out of the way and prevent “bird’s nests” on the quit
back. Place your left hand on the template and hold it tight enough to
prevent slipping but loose enough so the machine moves easily.
Bring
your machine to the 9 o’clock position on the template. Bring up your
bobbin thread and place the thread “tails” under the template. This will
hold your threads out of the way and prevent “bird’s nests” on the quit
back. Place your left hand on the template and hold it tight enough to
prevent slipping but loose enough so the machine moves easily.
Begin stitching around the template, keeping the side of the hopping foot of your machine AGAINST the edge of the template. See the photo at the right. Keep a little bit of sideways pressure on the machine head so that the machine moves easily against the template. Continue stitching around the template until you reach the 6 o’clock position and stop your machine. Take a deep breath and relax! The photo at the left shows the stitching line around 3/4 of the circle. Note the thread tail under the template.
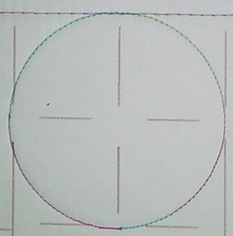
Remove your left hand from the template and move it to the other side of the hopping foot and needle. Continue stitching around the lower half of the template until you overlap the stitching at the beginning of your circle. Your circle is complete. It should be perfectly round with the start and stop area barely noticeable. See the photo at the left.
From this basic circle a myriad of designs can be created! All the designs shown below are based on this circle and are all stitched in the same manner. If you are a new longarm quilter or new to template work, practice making circles until you are very comfortable stitching them before you move on to more complex patterns and designs. Remember, the more you practice, the better you get. The more you practice, the sooner you’ll get better!
Stitching around the circle template with your quilting machine is very similar to cutting curves with a rotary cutter and a (quilt) piecing template. You need to keep the rotary blade up against the curved edge of the piecing template by putting “side” pressure on the blade. Think of your quilting machine as the rotary blade and keep side pressure against the circle template as you move the machine around the circle.
The following photos shows many of the different patterns that can be made with circles. All these patterns - an many more - are included in the Instruction Manual that comes with each set of the Circle Templates.
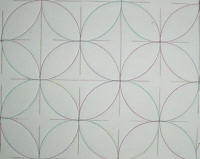
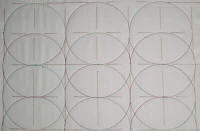
Overlapping rows of circles creates this traditional pattern. It is sometimes called Pumpkin Seed, Cathedral Windows or Wine Glass.
Clamshells is another traditional pattern that is easy to create on the longarm quilting machine.
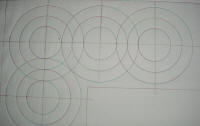
I call this pattern Stacked Circles. It give a totally different look to rows of circles. This pattern adds a lot of texture to the quilt.
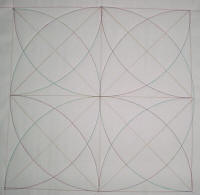
Even block designs can be quilted with circle!
Unique borders can be created with circles. The Circle Template instruction manual includes several border designs along with specific longarm instructions for turning the quilt.
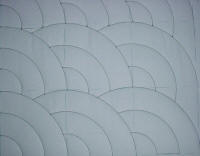
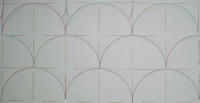
Baptist Fans are a very traditional quilting design. The Circle Template instruction manual includes 11 page of step-by-step Baptist Fan instructions including how to create a Baptist Fan border.
Baptist Fans is one of my favorite patterns to stitch!